What is a HDPE mould?
HDPE (High-Density Polyethylene) resin molds are a type of mold made from HDPE plastic, which is a material that’s known for its non-adhesive properties – making it it an ideal material for creating molds for epoxy resin casting as resin won’t stick to it.
HDPE moulds are perfect for flower preservation, using with wood projects and way more!
Why are HDPE moulds so good?
As HDPE is a strong and solid material, it guarantees that you won’t get warping or wonky finishes like you might do with silicone. They also don’t need any support as you might need with a silicone mould which can be tricky to get right. When looked after properly (stored safely in a dry dark place and handled in a way that will avoid scratches), you can use your HDPE mould time and time again.
Moldi HDPE mould review
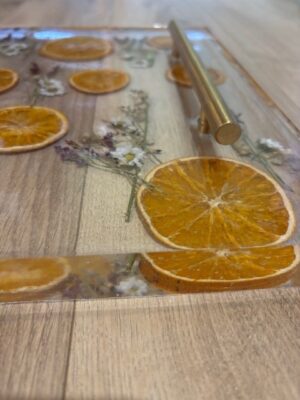
We tested Moldi’s handmade HDPE tray mould and WOW – its so easy to use and gives the perfect finish every time. These handmade moulds are created with precision and care.
We used the tray mould with gold handles. The mould comes with built in stabilisers for the handles so you can position and keep in place the handles while you pour meaning no more drilling and screwing – you can simply set the handles in the resin – Whooo!
How to assemble a HDPE Resin Mould
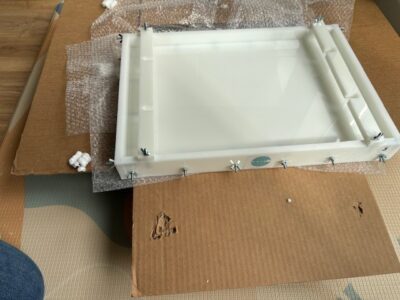
Most moulds will come packaged flat packed which means they’re easier to ship and store.
Here’s how to assemble your HDPE mould:
- Lay out your mould ensuring the numbered parts are all in the correct order.
- Line up your threaded inserts with the pre-drilled holes.
- Slot your edges into the threaded inserts carefully.
- Attach your wing nuts to each thread and tighten securely.
- Check your mould to ensure there is a tight fit along all edges – adjust wing nuts if necessary.
- Place your mould on a flat even surface that has a protective layer covering it.
- Once in your final position and ready to pour, add your handles in the desired position.

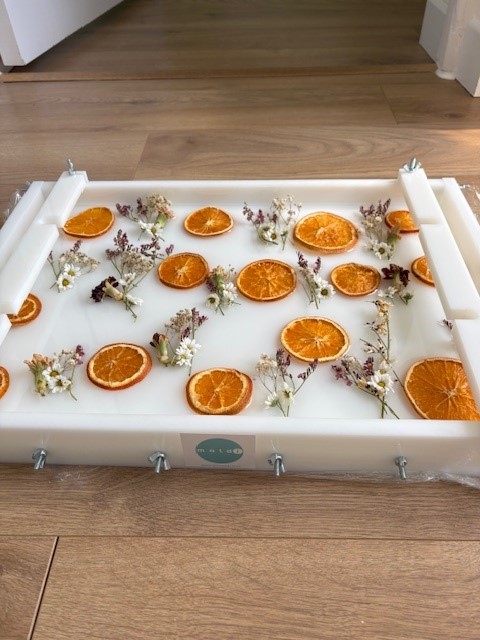
How to add objects and resin to a HDPE Mould
There’s no need to use release spray or alcohol before adding to your mould but it can be used if you want an added piece of mind.
TIP: Make sure whatever it is that you’re adding does not reach the top of your mould. You want to ensure all items have enough depth to be covered fully by resin.
Account for items floating in your first pour too!
Always ensure you’re selecting a resin that is right for the mould. If you are planning on adding deeper layers, you’ll want to select a good high quality Deep Pour Resin. Take a look at our blog on ‘How to choose the right resin’ if you’re unsure.
How to demould a HDPE mould
- Un-screw the wing nuts from all screws
- Turn your mould over so the bottom is facing you
- Using a mallet or hammer, lightly tap the bottom of a long edge (one of the sides of your mould that is longer and runs the whole length of your piece) from the centre of your mould away from you
- Gently wiggle free your edge. Do not use tools as this could scratch your resin and or the mould.
- Free up all edges one at a time.
- When you get to the bottom of your mould, attach the square piece of HDPE that came with your Moldi Kit to one of the bottom panel screws and tighten with the wing nut
- Slide one of your edges back on to use for leverage
- Gently tap the block of HDPE to release your bottom section.
There’s a video on Moldi’s website that perfectly demonstrates how this is done.