
Learn how to make this stunning beach themed UV resin keyring. It’s super easy and takes no more than 20 minutes. Perfect as a last minute gift or for a quick crafting session.
Watch the process video at the bottom of the blog.
Difficulty: Easy
Time: 20 minutes
What you’ll need
The essentials
- UV Resin
We like to use Apex Resin. Get 15% off with code RESINFORBEGINNERS - UV Light (either lamp or torch)
- Nitrile gloves
- Workspace covering
- Baby wipes
- Toothpick
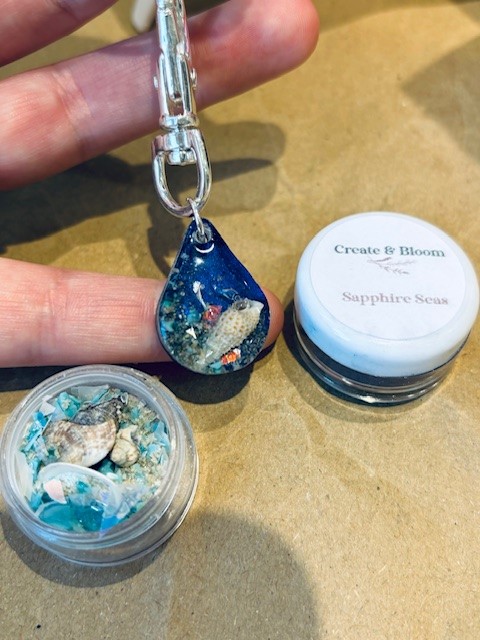
For the keyring
Our moulds, hardware and texture all came from Create and Bloom Crafts.
- Blue mica powder
- Small shells / sand
- Clear keyring mould
- Keyring attachments
How to make your UV resin keyring
- Set up your work space. Laying everything out can reduce knocks and spillages. Having a bag for your waste and baby wipes to hand it’s always useful when working with resin.
- Add a few drops of UV resin to your mould.
- Add a small amount of blue mica powder and mix with a toothpick. Remember:
– Don’t allow the sharp end of the toothpick to scrape your mould as this will cause damage.
– Don’t add too much colour. Your UV light needs to be able to penetrate through the colour to cure it. Blocking the resin with too opaque of a colour may mean your UV resin will not cure to its full strength. - Clean around the edges of the mould.
- Place your mould under your UV Light for 2-3 minutes (depending on the instructions provided on your resin bottle).
- Turn your mould over and cure again for the same time.
This ensures the bottom of your mould is fully cured. Especially important when you are adding a darker colour. - Add a small amount of clear UV resin.
- Use toothpick or tweezers to place your sand and shells.
- Place your mould under your UV light and cure again.
- Add your next layer of UV resin. Ensure you use a toothpick to allow resin to fill any gaps.
- Cure again.
- Remove your piece from your mould.
- Carefully sand any rough edges with a fine grit sandpaper.
- If your hole has been filled with resin, you may need to re-drill the hole with a small hand drill or dremel.
- Place a jump ring through the hole in your resin. Tighten with plyers.
- Attach your keyring. And you’re done 🙂
UV keyring process video
@resinforbeginners Full reveal at rhe end 🌊🐚 Making seaside themed keyrings after being inspired by a visit to the beach today 🌊🐚 using moulds, micas, textures and keyrings from @Create and Bloom Crafts – Lou and Apex UV Resin from @Just4youonlineUK these are going to make amazing Christmas gifts for all my family who live at the coast ☺️ #resin #uvresin #resintutorial #resinkits #resinart #resinideas #resinkeyring #micapowder #resinpigment #shells #beach #beachmemories #sand #sea #resinpour #asmr #resinforbeginners ♬ Seaside – Yenibi
Check out our other UV Resin Tutorials here.