
Are you wondering if you can mix UV Resin and Epoxy Resin in the same project? The answer is yes. And it gives some amazing results! This epoxy resin and UV resin raindrop coaster tutorial talks you through how you can use both resins in the same project.

Project time: 8-24 hours (depending on the epoxy resin you choose)
Difficulty level: Easy – perfect for beginners
Scroll to the bottom of the post to get 15% off all Apex Resin and pigments.
What you’ll need to create your raindrop coaster:
- Epoxy Resin
You can find epoxy resin at craft stores and websites or Amazon. We love using Apex One Coat Resin as it is highly heat resistant, non toxic, low on bubbles and easy to work with. - UV Resin
Again, we love Apex UV Resin due to it’s heat resistance and durability. - UV Light
You will need a UV light to cure the UV resin. - Resin Moulds
Moulds are available in various shapes and sizes. Silicone moulds are best for making coasters and will add a smooth shiny finish. - Mixing Cups
Use disposable plastic or reusable silicone mixing cups for mixing the resin. We like to save yogurt pots too but make sure they’re washed really well. - Stir Sticks
Silicone stirrers are best for reducing bubbles. We often use wooden ones too especially for adding pigments. - Pigments or Dye
You can use resin pigments, alcohol ink, or even acrylic paint to add colour.
Check out our blog on ‘What can I add to epoxy resin‘ for more ideas of what you might like to add to your coasters.
We used pigment powder from Just4youonlineuk.com for this project. - Makeup brush
An eyeshadow brush is perfect for this. - Heat Gun, lighter or isopropyl spray
Heat guns are a quick way to remove air bubbles from the resin. Make sure it is a crafting heat gun you buy rather than a DIY heat gun as they can be too powerful and will melt moulds and damage your resin.
Isopropyl alcohol spray is a great alternative that is less likely to cause damage to any mould and can also be used to help clean your equipment. - Protective equipment
Wear gloves, safety goggles, and work in a well-ventilated area not around children or pets. You may choose to use a respirator mask if your chosen resin is not free from VOC’s or toxins. - Measuring Scale / cups
Where your resin is measured in parts (some may be measured in volume) like Apex resin, we use scales to measure our two parts. This helps ensure you’re getting accurate measurements. We find these kitchen scales to be really accurate and durable.
We like to cover them in clingfilm / protective plastic to ensure they don’t get covered in the inevitable resin drips.
You can also use a marked measuring cup. Either silicone reusable ones or disposable plastic ones.
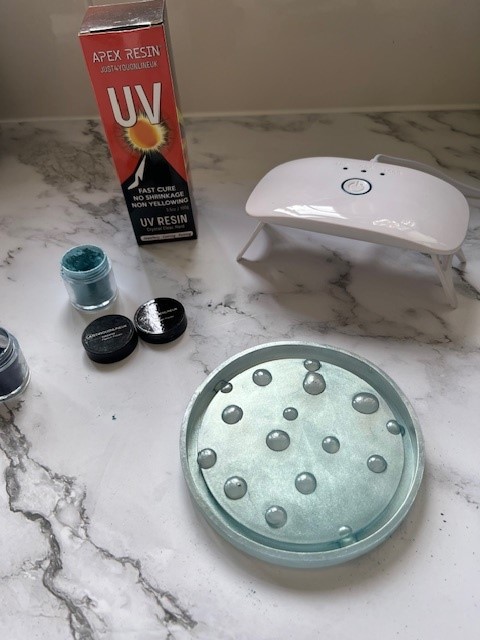
Stage 1 – Create UV Resin Raindrops
- Use UV resin to add drops to your mould. Pour slowly from the bottle so you can control the size.
- Place your mould under the UV light. You may need to do this two or three times to make sure that all sections of your mould are fully cured under the light.
- Next – add your mica powder. Your colour should cover the whole mould paying close attention to around your resin drops. Shake off excess powder.
@resinforbeginners Part 1 | Mixing Apex UV Resin and Fast Cure Epoxy Resin to make a raindrop coaster ☔️ Cant wait for the results! Get 15% off at @Just4youonlineUK with code RESINFORBEGINNERS #apexresin #resin #uvresin #epoxy #epoxyresin #uvresin #epoxyart #micapowder #micapigment #resincoasters #resintutorial #resinpour #resincraft #resincrafts ♬ Chuva – yagobeats
Stage 2 – Add your Epoxy Resin
- Prepare Your Workspace:
Cover your work surface with plastic. Clingfilm works well for this. Make sure the area you are working in is well-ventilated. - Safety First:
Put on gloves and safety goggles. Epoxy resin can be harmful to your skin and eyes. A respirator mask is also recommended for resins that contain toxins or VOC’s. If you’re unsure, check the guidelines for the type of resin you are using. - Measure and Mix:
Next, measure the epoxy resin and hardener according to the instructions on the packaging.
Use separate cups for the part A and part B then combine them in a third cup.
Stir the mixture slowly for about 2-3 minutes. Making sure you scrape the sides and bottom of the cup. You want the mixture to be clear and streak free. If it is not, then it is unlikely to set properly or may be cloudy when it sets. Stirring slowly will reduce the number of bubbles in your mixture. - Add Colour:
If you want to add colour to your resin, now is the time to do it. You can use resin pigments, alcohol ink, or acrylic paint. Mix it thoroughly until you achieve the desired colour. You may want to split your resin mixture and add two colours separately.
Check out our blog ‘What can I add to Epoxy Resin’ for some colour inspiration. - Pour Resin into Moulds:
Pour the resin mixture into your mould and fill to the top rim. - Remove Air Bubbles:
Use a heat gun or heat torch to carefully pass the flame over the resin’s surface. This will help eliminate air bubbles. Be cautious not to overheat the resin or get too close to it or you’ll damage the resin and mould.
You could also use isopropyl but not together with heat as it is flammable. - Let It Cure:
Allow the resin to cure according to the manufacturer’s instructions. This typically takes 24-48 hours, but it can vary depending on the brand and environmental conditions. Try to keep your resin in a warm area especially during winter. - Demould:
Once the resin is fully cured, carefully remove the coasters from the moulds. Silicone moulds are flexible, making it easier to pop the coasters out. - Final Touches:
If there are any rough edges or imperfections, you can sand the coasters gently. We add silicone dots to the bottom of our coasters to ensure surfaces are protected and the coasters are steady. - Enjoy Your Resin Coasters:
Your resin coasters are now ready to use! They make great gifts or home décor.
@resinforbeginners Part 2 | Raindrops in resin ☔️ epoxy resin and uv resin with mica powder. Get 15% off all with code RESINFORBEGINNER at @Just4youonlineUK #apexresin #resin #uvresin #epoxy #epoxyresin #epoxyart #micapowder #micapigment #resincoasters #resintutorial #resinpour #resincraft #resincrafts #asmrvideo #asmr #resinasmr #resinsupplies ♬ I Think I Like When It Rains – WILLIS