
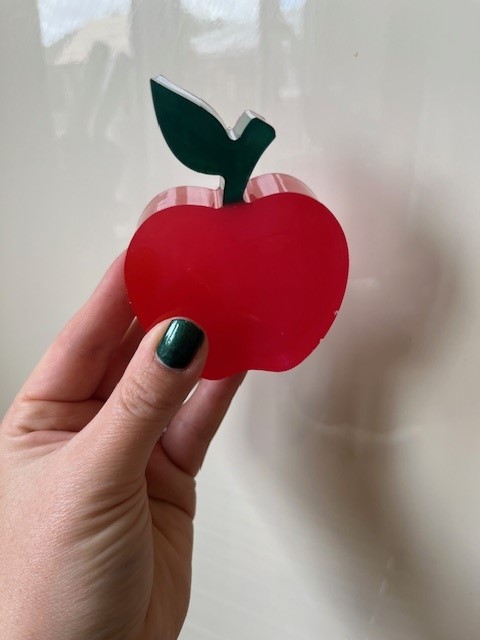
These epoxy resin apples are really simple but effective. They’re great as a decoration on their own or they can be personalised to create a lovely teacher gift.
Project time: 48 hours
Difficulty level: Easy
What you’ll need:
Epoxy Resin
You can find epoxy resin at craft stores and websites or Amazon. For this project, we are using Apex Resin from Just4youonlineuk. They have a range of resins including high gloss, fast cure and deep pour. For this project, we chose to use Fast Cure as it thickens quickly and has less of a chance or seeping through the resin tape.
Apple Silicone Mould
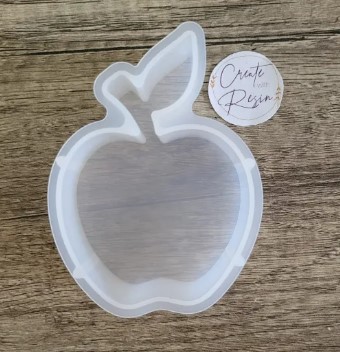
We used the silicone apple mould from Create With Resin Craft Supplies.
Mixing Cups
- Use disposable plastic or reusable silicone mixing cups for mixing the resin. We like to save yogurt pots too but make sure they’re washed really well.
- If your resin is to be measured by volume, you will need marked measuring cups. If it is by weight, you’ll want a good pair of kitchen scales.
Stir Sticks
Silicone stirrers are best as they are easy to clean and reusable. They can reduce bubbles too. We often use wooden lolly pop sticks too which are useful for adding colours and textures.
Heat Gun, lighter or isopropyl spray
Heat guns are a quick way to remove air bubbles from the resin. Make sure it is a crafting heat gun you buy rather than a DIY heat gun as they can be too powerful and will melt moulds and damage your resin.
Isopropyl alcohol spray is a great alternative that is less likely to cause damage to any mould and can also be used to help clean your equipment.
Protective equipment
Wear gloves, safety goggles, and work in a well-ventilated area not around children or pets. You may choose to use a respirator mask especially if your chosen resin is not free from VOC’s or toxins.
Always follow the safety instructions for the brand of resin you are using.
Text (optional)
There’s a number of ways you can add text to resin (waterslide paper, temporary tattoos, stickers) check out our blog for some suggestions of how to add text to your epoxy resin.
How to make your resin apple
Check out our video at the bottom of the page to see how it was done.
Prepare your resin
- Mix your resin according to your brand’s instructions. You should be looking for a clear and streak free resin. Scrape the sides and bottom of your cup otherwise, when you come to pouring, un-mixed resin could make it’s way in to your mould and prevent it from curing properly.
- Slowly add your green colouring. You can choose a translucent look with alcohol inks and dyes like we have done here. Alternatively, you can achieve a more solid opaque look with pigment pastes or acrylic paint.
TIP: Make sure that whatever you choose to add colour, you don’t use more than 10% colour to resin (i.e. if you use 10ml resin, don’t use more than 1ml of colour). Using too much colour will mean that your resin may not cure fully.
- Take note of the working time – this is the amount of time you have after mixing before your resin will start to thicken and set. You ideally want to let your resin thicken a little so mixing your resin while you prepare your mould is ideal. This time will also allow for any bubbles to rise naturally out of your mix.
Section off your apple with resin tape
- We used JDiction Resin tape as its strong but doesn’t tend to leave residue on the resin once you remove it.
- Firmly press your tape in to your mould ensuring you overlap the sides and bottom. Basically you want to form a tight seal so that your resin can’t escape. We recommend that you trim the tape to size before adding it to your mould to make it as easy as possible.
Add your first section of resin
- Slowly pour your first stalk section. We did have some resin slowly escape but not too much. You can firmly press your tape back to the mould if needed.
- Don’t worry about a little excess, this can be trimmed down once cured (see the video below for how it was done).
- Let your first section cure until solid. The timings will vary depending on the resin you have chosen and if you will be using a heat mat or not. If you’re unsure if it is ready, leave it longer! You need the resin to be cured to easily remove your resin tape.
Remove the resin tape
- Slowly peel away the edge of your tape holding firmly on to your mould. Try not to let your top section of resin separate from the mould edge as this can leave a gap for your second colour to seep through. (You’ll see in the video that this happened on our first attempt!).
- Slowly remove any excess resin by peeling it away from the mould.
Mix and pour your apple
- Once your first layer is fully cured, you can mix and pour layer two.
- Slowly pour your second layer, again taking care for bubbles. Use heat or isopropyl if necessary to get rid of surface bubbles.
Un-mould
- Make sure you don’t rush to un-mould. Wait your resin brand’s full curing time. Your resin should easily pull from the mould edges.
- Once out of your mould – you may feel it needs a very light sand to remove sharp edges.
Optional – Add your text
- Check out our blog on how to add text to your resin, for a range of different ways of personalising your resin apple.
- We recommend that you add a clear top coat over your text to protect it. See our blog on adding top coats for different methods of doing this.
@resinforbeginners Results at the end! 🍎 How cute at these epoxy resin apples 🍎 the resin tape leaked a little so I’d pour the first part in layers (I was just too excited to try it 😂). Still, great effect! Discount on moulds and resin in the comments #apexresin #createwithresinsupies #epoxyresin #resin #resincrafts #resinart #apples #teachergift #res #green #resinpour #asmr #resinunmolding #resinmould #resinsupplies #resinpigment ♬ Apples – Netherfriends