
Wondering if you need a heat mat for your epoxy resin projects? Or not even sure what one is?
Using a heat mat with epoxy resin can help to control the curing process. If your resin usually takes 24 hours to set, a heat mat can reduce that to 3-6 hours. The time saving will of course be impacted by other factors such as your air temperature and depth of the moulds you are using.
A heat mat can also reduce bubbles in your finished project, meaning you can avoid using heat torches which can damage your mould or cause your resin to burn.
Here’s a general guide on how to use a heat mat with epoxy resin:
Prepare Your Workspace:
- Set up your work area in a well-ventilated space, preferably with a consistent temperature.
- Ensure that your work surface is level.
Choose the Right Heat Mat:
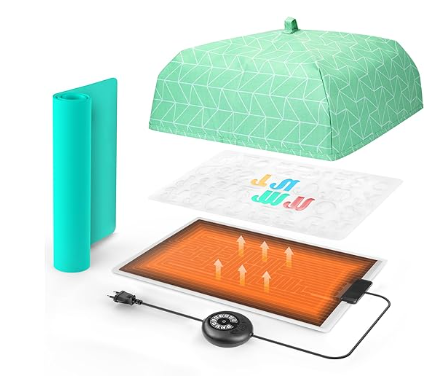
- Select a heat mat designed for use with epoxy resin – we recommend this one from Amazon.co.uk. (Here’s the equivalent in the USA).
It comes with a dust cover and easy to clean mat covers. - Most mats, like this one, typically have adjustable temperature settings and a timer that are easy to adjust depending on your project and outside temperature. It is important to not overheat your resin too quickly or you could end up with a flash cure.
Position the Heat Mat:
- Position the heat mat on your work surface in a way that it won’t be in direct contact with the resin mixture or any containers. Make sure your surface is flat or you’ll have an uneven finish.
TIP: If you use a levelling table, make sure it is suitable to have a heat mat sit on top of it. You can always use a barrier like glass or heat proof mat to ensure you do not cause any damage.
Mix the Epoxy Resin:
- Follow the manufacturer’s instructions for mixing your epoxy resin. Make sure to mix it thoroughly to avoid any uneven curing.
- Add any pigment or texture you wish to use.
Pour the Resin:
- Pour the mixed epoxy resin into your moulds or onto your project surface.
TIP: If you place a heat proof silicone mat on your heat mat, you can place your moulds or project on to the heat mat and pour directly there. This can prevent spills as you lift your moulds or project on to the mat.
Place your piece on the mat:
- If you are not adding your mould direct to the mat, place the moulds or project on top of the heat mat. Alternatively, you can place the heat mat under the containers holding the epoxy resin.
Set the Temperature:
- Set the heat mat to the recommended temperature for your specific epoxy resin. This information should be available in the resin manufacturer’s guidelines.
TIP: Start with a medium heat and a time of around 2 hours – this should be suitable for most medium sized projects like coasters, trays and jewellery. You can always check back on your piece and put it back on for longer if needed.
Monitor the Curing Process:
- Keep an eye on your epoxy resin as it cures. The heat mat should help to reduce bubbles and ensure a smoother finish but you may need to use a heat torch to pop bubbles before they set. Make sure you DO NOT use alcohol spray with a heat mat – alcohol is flammable. Check out our blog on how to reduce epoxy resin bubbles for more tips.
Adjust Temperature as Needed:
- Depending on the manufacturer’s recommendations and your observations, you may need to adjust the temperature on the heat mat during the curing process. Make sure its not too hot as overheating can lead to a flash cure. This is where your resin overheats and can bubble up over your moulds and not set evenly.
Allow Sufficient Curing Time:
- Even with the use of a heat mat, it’s important to allow the epoxy resin to cure for the recommended time. Rushing the process may lead to incomplete curing.
Clean Up:
- Once the epoxy resin has fully cured, clean up any tools or containers following the manufacturer’s guidelines.
TIP: Always refer to the specific instructions provided by the manufacturer of your epoxy resin and the heat mat, as different products may have varying recommendations.
Additionally, exercise caution when working with epoxy resin, ensuring proper ventilation and using personal protective equipment as needed.
hi I want to do wooden coasters with a seascape design in resin can I use a heat mat for this or should I leave it to cure for the normal time without the mat I am new to this mat. Thank you Cee
I would let it cure over the normal time but keep checking on it every 10 minutes or so for the first hour as bubbles can appear very slowly. If you catch them before the resin is cured, they’ll come to the surface and will be able to be popped with a small toothpick. As long as its not too set, the resin will fold in on its self. If it leaves a gap, you can sand with a very fine grit sandpaper and add a top coat.
Has any one had issues with the heat mat warping their leveling tables? I have a friend that constantly has the issue of warped leveling tables
Not all levelling tables are suitable for a heat mat. Check the description when ordering. I have a Jdiction levelling table which says you can use a heat mat on it and I haven’t had any problems 🙂