
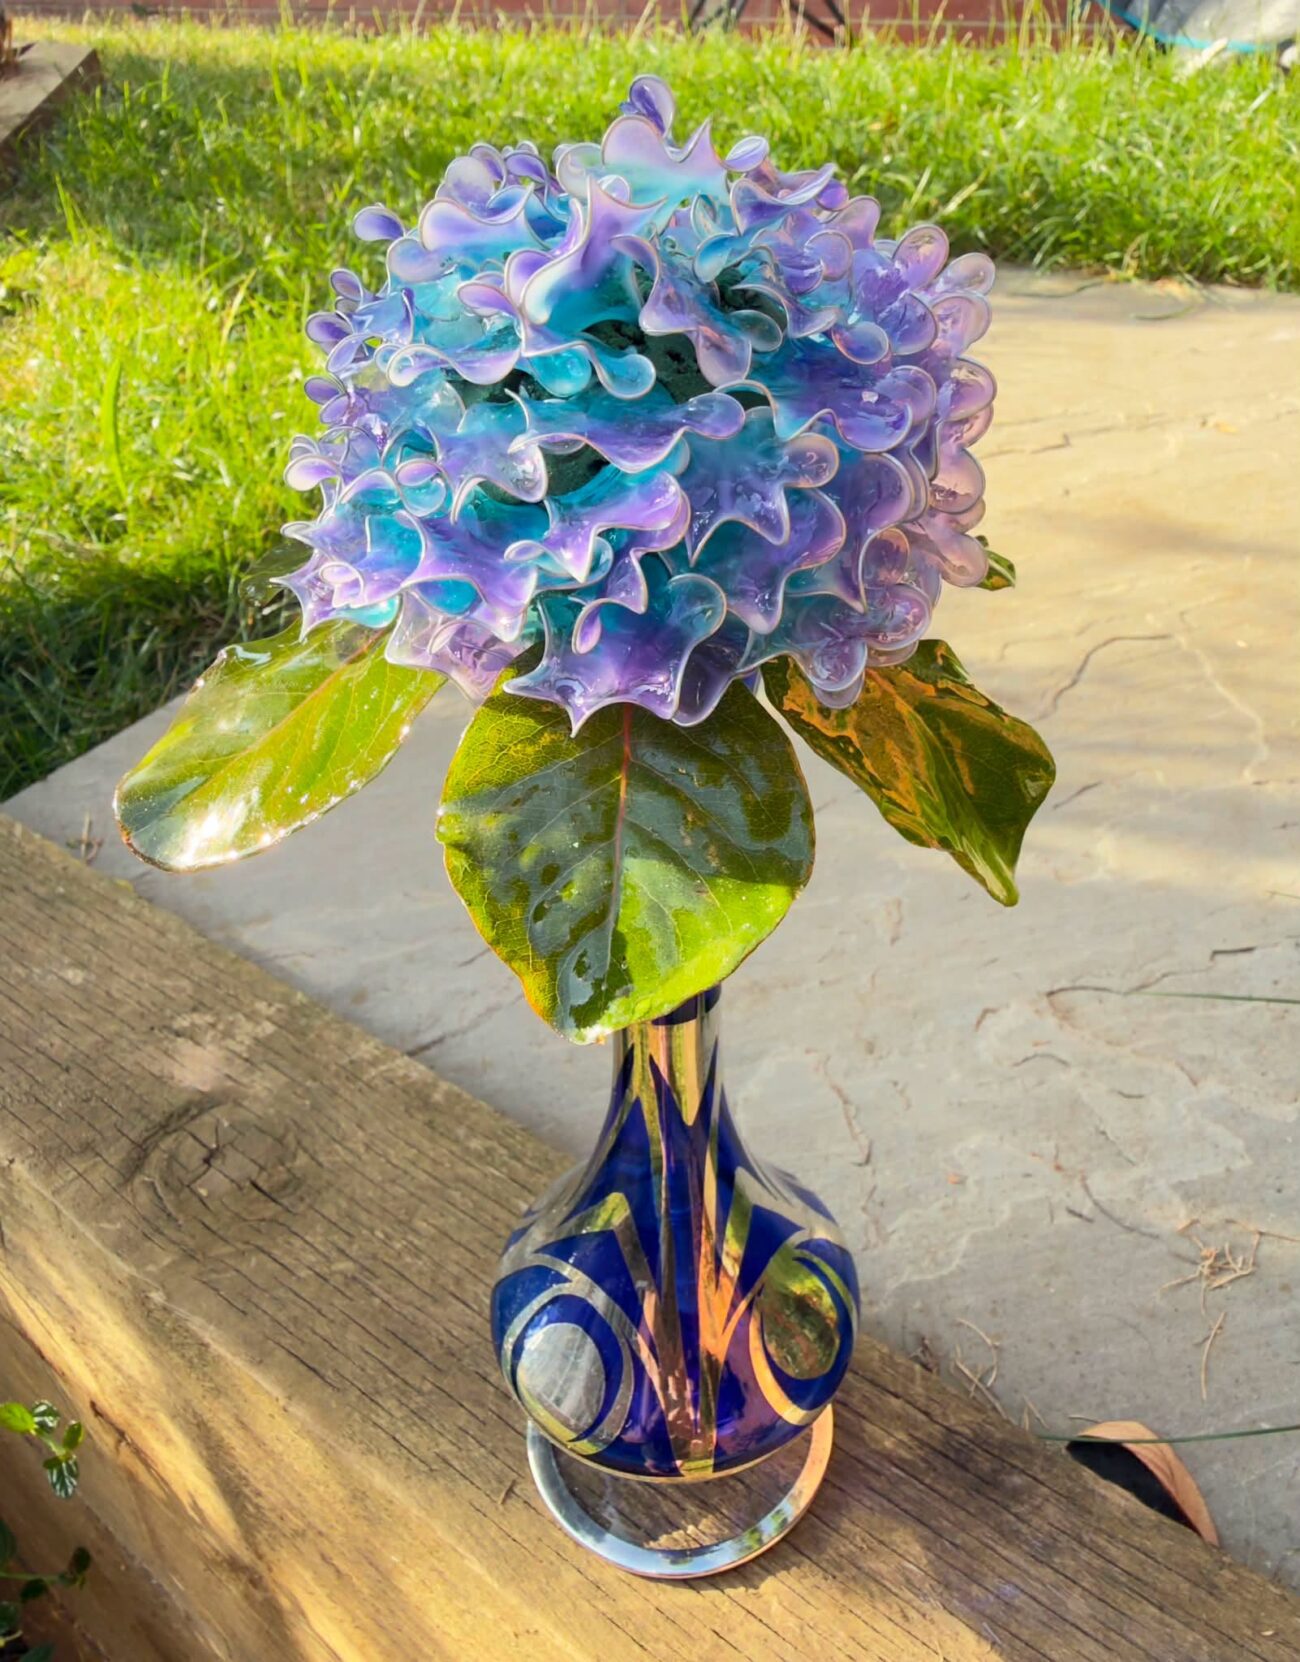
UV Dipping Resin Hydrangea Bloom Tutorial
An Original tutorial written by the amazing Claire from House of the White Rabbit. Visit her mobile site to purchase the video that accompanies this tutorial for only £5.
NOTE: THIS TECHNIQUE IS FOR UV DIPPING RESIN ONLY
(NOT FOR USE with standard UV resin or epoxy of any kind)
Kit Required
- PPE – mask and gloves. All other PPE as deemed necessary by the individual.
- 6 large real, green leaves – must be NATURALLY dehydrated @ 2weeks (NOT air fryer)
- Craft knife & large kitchen knife
- UV resin curing lamp (1 sided will do) & UV torch (plus something to prop the lamp up
slightly – see section 1 below)
Get 15% off the Resiners dual UV and Epoxy Curing Machine with code CULLERCOATS - 0.7 gauge craft wire (silver colour 5 metres, green colour 1meter) & wire cutters – NEEDS TO
BE SPECIFICALLY 0.7 gauge - Strong paper straw @1cm in diameter
- Paper towels, brush cleaning fluid & couple of toothpicks
- Ruler & large flat head map pin – head should be 1.5-2cm in diameter – MUST BE FLAT HEAD
- 0.4mm diameter round, wooden doweling rod @5cm long
- 3 x green foam flower blocks – ideally 2 of @10cm(Long) x10cm(Wide) x4cm(Deep) and the
third a cube of 10x10x10cm – NEVER GET WET DURING THE ENTIRE PROCESS - Sturdy tube to hold the bloom whilst you are making more petals (like a strong inner loo roll)
- UV Dipping resin in white, clear, light blue & purple (at least 40ml pots) – must be DIPPING
resin. I used FunShowCase sourced from Amazon UK, in White, Clear, Purple and Blue (not
Royal – which is a darker blue)
If you are working outdoors, DO NOT LEAVE the lids off of the resin pots – the UV rays of
any sunlight will start to cure the resin in the pot! - 3 old paint brushes size 6
- 50 grit sanding block
How its done
1) Set Up the UV Lamp
Lamp needs to be propped up at both front sides – at a slight angle to enable you to get
petals easily in and out from under the lamp. I used 2 rolls of 4cm wide masking tape.
Place the two 10x10x4cm green foam flower blocks alongside one another under the lamp
(the one on the left will hold your white base layer petals while they are curing and the one
on the left will hold your petals with the blue and purple painted on layers.
2) Prepping the Flower Foam Sphere to House the Bloom Petals
- Think about the size of the bloom head as a whole when it is finished with all wire petals
embedded – you need to take account of the length of the petals and how they will add to
the foam sphere to become the overall bloom size. You want the finished bloom to be as
realistic a size as possible. - For an average Hydrangea, you will need your green foam sphere to be 6-7cm in diameter.
- Go outside or lay down a towel at this point – it gets messy!! Take the 3rd green foam block –
the one which is cubed 10x10x10cm and cut a 8-9cm cube chunk off the end with a large,
sharp kitchen knife – it is very easy to cut. Do NOT get the foam wet. Cut off corners to start
to make the cube look like the start of a sphere shape. - Finish the sphere by using your 50 grit sanding block to smooth out all of the surface area.
The finished, smooth sphere should be 6-7cm in diameter. - You can avoid having to cut the 3rd green foam block and finishing into a sphere if you
sourced flower foam which is already pre-shaped into half circles – and then simply glue the
2 together. - Push into the foam your large, flathead map pin – anywhere will do – this will become the
base of the bloom, give you somewhere to hold it as you work and also become the top of
the stem later in the project. Glue into place with the clear UV resin and cure with a UV
torch. - Place the sphere carefully to one side in the top of your sturdy tube or other holding kit with
the map pin facing down over into it. This will hold your bloom safely while you work – never
place it on its side.
3) Creating the Wire Petals
- Think about the size of the bloom head as a whole when it is finished with all wire petals
embedded – you need to take account of the length of the petals and how they will add to
the foam sphere to become the overall bloom size. You want the finished bloom to be as
realistic a size as possible. - Cut lengths of 20cm of your silver colour 0.7 gauge wire – you will require around 100-120 of
these. The wire should be precisely 0.7 gauge. This is because thinner wire will not get
enough purchase in the white dipping resin to create the necessary film base layer. Thicker
wire is harder to manipulate by hand and not aesthetically pleasing for a flower bloom. - For each 20cm length of wire, wrap it tightly around your 5cm long, 0.4mm diameter
wooden dowelling rod – use the full length of the rod – to create a coil – a bit like a spring.
The rod should be 0.4mm diameter as any wider makes the petal shapes too big. - Remove the wire coil from the rod and with both hands, one on each end of the coil, pull the
coil carefully apart until you get a wavy line of wire – you are looking for about 12cm in
length for the wavy wire. DO NOT pull the coil all the way out. - Starting by holding at the middle of the wavy wire, make a small loop by crossing one tail end
over the other. This loop of wire becomes your 3D petal frame and you are looking for the
petal loop to be about 2cm in diameter. You must look for 2cm or less as if the petal loop is
any larger, it becomes much harder to create a resin film when it is dipped. - Twist the two tail ends around each other at the bottom of the petal to seal the loop fully
closed. You need the wire petal frame to be completely enclosed otherwise you dipping
resin will not form a film. - Pull the tail ends back into as straight a piece of wire as you can manage and create a 90
degree bend to the petal loop with them – this is so that the petals can be stuck into the left
hand green flower foam block under your lamp whilst ensuring that the petal is left
horizontal / flat while curing. - You now have your wavy wire petal 3D frame.
- To note – it doesn’t matter if some petals are up 2cm in diameter and some slightly smaller.
In fact, it’s better that they are slightly different. Two reasons – one, flower petals in nature
are never precisely the same and secondly, as you come to finish embedding all of your
wired petals into the foam sphere, you can use small ones to fill in any gaps; the end bloom
should hardly show any of the green foam sphere underneath.
4) Petals – Creating the White UV Dipping Resin Film Base Layer
- With the bent tail ends pointing down over, take the petal and dip it in the white UV dipping
resin pot. - VERY SLOWLY AND GENTLY remove the petal loop from the white dipping resin. You will see
that it will have created a white / transparent, very thin film across the whole petal – a bit
like when you dip a bubble stick in the bubble liquid before blowing. Only dip as far as the
start of the tail ends, i.e. only dip the looped petal part. - If a film is not created, or you have a hole in the film, try dipping again. If a film is still not
created, check that the loop of your wire petal is fully sealed / completed by the twists you
added to your tail ends. A complete film will not form on an unsealed loop or if the petal is
too wide. - You will see that the 3D wavy shape of the petal loop frame creates white, lined “veins” as
the resin tends to settle in the furrows. You will still see these veins when you paint over your
blue and purple layers – it adds to the realism of the petals! - As you go through this dipping process, after a few petals you will see that there might be air
bubbles which start to form at the top of the white resin in the pot. Simply pop them every
so often with a toothpick. - Once you remove the petal from the white dipping resin and a film is created, that film will
be VERY FRAGILE – take care with it. It cannot touch anything on its way to the curing lamp
or the film will burst. - Once removed, embed the bent tail ends of the petal into the BACK of the green foam block
on the left under your curing lamp. Set the lamp away for 2 minutes or until the petal is no
longer sticky (test gently with the tip of a cocktail stick). Your foam block should hold up to 6
petals in this way so you can get quite a little production line going. Just remember though,
that if you have more than one petal embedded in the foam under your lamp with a time
gap in between them being added, EACH WILL NEED at least 2 minutes curing time. - If you have more than one petal curing at a time, the looped petals with the resin film
CANNOT touch one another or any part of the foam block or the inside of the lamp. You will
end up gluing your looped petal to whatever it was touching!! (Yes, I did this….) - Even though you are only using a single sided UV resin curing lamp, you will NOT NEED to
turn your wire petal loops over to cure from the other side. The dipping resin film is so thin it
will cure right the way through from the top.
5) Petals – Painting on the 2nd Layer of Blue and Purple Blended UV Dipping Resin - Once the petal is cured, leave to cool for about 60 seconds
- Using your Blue UV dipping resin and a size 6 paint brush apply a generous coat of the resin,
painting UP FROM the base of the petal loop two approximately 2/3 the way up the petal.
Paint carefully and gently – at this point you still only have a first, very thin film of white
resin, albeit it is cured. - Wipe / dry clean your brush on a paper towel. Immediately after painting on the blue paint
on the purple WORKING DOWN from the top of the petal. Paint up to the top line of the
blue. - Wipe / dry clean your brush and then blend the join of the blue and purple resin together;
just mussy up the colours slightly. - As the dipping resin is semi-translucent, at this point you will still be able to see the lovely
white petal “veins” you created above – just makes the petal more realistic. - Place your now painted and blended petal into the right hand side flower foam block under
the lamp – push the tail ends into the foam. Cure for approximately 3 minutes or until there
is no stickiness remaining. - You should be able to hold up to 6 painted petals on your foam block under the lamp at one
time. - Again, since the layers of the resin are still relatively thin, you will NOT need to turn the petal
over to cure the underside.
6) Adding the Finished Petals to the Foam Sphere - Straighten out the bent tails end of the petal and trim them off to leave around 4cm length
of wire in addition to the petal loop itself. - Push the tail ends into the foam sphere – your first one should be exactly opposite your flat
map pin, i.e. you need to start adding the petals from the very top of the foam sphere. Push
the tail ends in until you reach the very bottom of the petal loop. - Placement of further petals should be done VERY close together as you want the end goal to
be that you see as little of the foam sphere underneath as possible. - Don’t make completely straight lines of soldiers with the way your petals sit in the foam
sphere – it won’t look realistic. Try to angle them slightly and overlap one another. - Although you have pushed the tail ends of the petal right the way into the foam sphere, your
petal mat still feel a little loose – some will, some will be fine as is. If it feels a bit loose apply
a tiny bit of clear UV to attach the base of the petal loop directly to the foam sphere and cure
with a UV torch. - If you are strengthening your petals into the sphere this way, you might want to wait to start
to do so until you have got quite a few petals in and you are happy with their placement.
Once they are glued in place you will damage the foam of the sphere trying to move them. - Cover the foam sphere until you have covered the entire thing, excepting a 0.5cm gap at the
base around the flat head pin. This is where your bloom leaves will sit.
7) Creating the Bloom Leaves (these are REAL leaves UV resin coated by painting) - You will need to have 6-8 REAL medium size (@ 6cm long, 4cm wide) oval green leaves –
actual hydrangea ones if you have them. I used 6 for the size of my bloom. - These need to have been naturally dehydrated – most easily achieved by pressing them
inside a book under a heavy weight, for up to 2 weeks or as soon as you think all the
moisture inside the petal looks gone. If the petal is fresh or still retains inner water,
eventually this will degrade and possibly yellow the clear UV resin it is covered with. I found
that using an air fryer to dehydrate did not work – it dried the leaves out so much that they
simply crumbled to the touch. - Cut 10cm lengths of your green 0.7 gauge wire. You will need a length for every leaf you use.
- Fold the green length of wire in half so that you have a looped end and two tail ends. Press
the full length of the double wire tightly together. - Turn your leaf so that it is face down; underside to the top. Place the looped end of the
green wire on the base of the leaf, giving it about 1cm actually ON the leaf. - Glue the loop in place on the underside of the leaf with a generous blob of clear UV resin
and cure with a UV torch. - Bend the green wire tail ends to 90 degrees to prep them to be pushed into the foam block
under your UV lamp – in the same way we did for the petals. This will allow the leaves to
cure without you holding them and stay horizontal during that process. - DO NOT DIP THE LEAVES IN YOUR CLEAR UV RESIN – YOU WILL GET FAR TOO THICK A LAYER
AND IT WILL VERY LIKELY BE UNEVEN. - Flip the leaf over and paint on a think coat of UV resin on this top side. Push into the foam
block under the lamp and cure for about 3 minutes or until the resin is no longer sticky. - Again, if you have multiple leaves curing simultaneously, they cannot touch one another, the
foam or the UV lamp itself as they will glue to whatever they shouldn’t be touching! - Remove the leaf from under the lamp and bend the green wire tail ends in the opposite
direction (180 degrees). You are going to repeat the process above, but for the underside of
the leaf. - Flip the leaf onto its back and paint on a think coat of UV resin on this bottom side. Push into
the foam block under the lamp and cure for about 3 minutes or until the resin is no longer
sticky. You WILL need to cure your leaves on BOTH sides as the thickness of the leaf itself
will hinder curing right the way through without turning . - Once the leaf is fully cured on both sides, straighten the tail ends out and trim them off to
leave around 4cm length of wire in addition to the leaf itself. - Add the leaf to your bloom by pushing the trimmed, green wire tail ends into the base of the
foam sphere, underneath your bottom most row of petals. Push the tail ends into the foam
until you reach the very base of the leaf. - Repeat the above for each leaf until your bloom as leaves right the way around it.
- If the leaf feels like it is still slightly loose, strengthen it with a UV resin bond between it’s
base and the foam sphere – as we did for the petals above.
8) Creating the Wire Stem - Trim your strong paper / carded straw (or whatever you are using – it just needs to be quite
strong to hold the weight of the bloom) to approximately 15cm in length – this is a nice
bloom length to hold or place in a stem vase. - Glue the CUT END of your straw to the flat head of the map pin on the bottom of your bloom
with a very generous blob of clear UV resin all the way around and cure with a UV torch. This
saves the neat uncut end for the base of the stem which is more likely to be seen. - Layer up on this resin affixment if your straw feels a bit loose after the first curing. Leave your
- Unravel / unknot about 3 meters of your 0.7 gauge silver wire.
- Place the end of your wire anywhere in the base of the foam sphere next to the flat head
map pin and cure in place with a blob of clear UV resin. - Wrap the wire tightly around the pin and gradually move to keep wrapping the wire down
over the pin. Keep pushing the wire up with your thumb to ensure that the wrapping is at
neat as possible – you don’t want to see any of the straw underneath. - Move your wire wrapping gradually down and around the top of the stem. At this point you
will be able to spin the bloom in your hand to gradually work your way down the whole
length of the stem. Keep the wire wrapping as tight as you can. - If you haven’t unravelled enough wire, to cover the whole stem, when you come to the end
of what you have cut simply glue it in place with a tiny blob of clear UV resin and cure with a
UV torch. Take the end of your new piece of wire and glue in the same way – next to the end
of your previous piece. - Once you have covered the whole stem cut your wire and glue the end in place.
- Place in a stem vase and enjoy!!!
9) The Aftermath - Boil the kettle, grab the biscuits. You deserve a large gin and tonic, if you prefer. Sit down,
release a long sigh and pat yourself on the back for getting through to the end of what is a
complex project – but with spectacular results.
Claire teaches resin craft online. If you would like 1 on 1 tuition to complete this project, you can
book hourly face-time sessions with her via her website (she use Google Meet). Claire is a member of the Guild of Master Craftsmen in the UK, based in Consett, County Durham – Member 129120.
Claire’s website specialises in petri cabochon necklace jewellery and online resincraft training.
Links – Contacts & Socials
Facebook: Claire Holoway https://www.facebook.com/claire.holoway
Facebook: House of the White Rabbit https://www.facebook.com/houseofthewhiterabbit/
Instagram: @clairecolourista https://www.instagram.com/clairecolourista/
TikTok: House of the White Rabbit https://www.tiktok.com/@holowayartsandcrafts
Pinterest Gallery: https://pin.it/4V0JCcaA0
Email: houseofthewhiterabbit@gmail.com
Etsy: HolowayArtsAndCrafts https://www.etsy.com/uk/shop/HolowayArtsAndCrafts
Website: www.houseofthewhiterabbit.com
Guild Master Craftsmen: https://www.findacraftsman.com/listing/house-of-the-white-rabbit