
Our step by step tutorial shows you how to make this halloween classic that can be customised in a number of ways.
Scroll to the bottom of the blog to see our video tutorial.
Difficulty: Easy
Time: 30 minutes to create. Up to 72 hours for your deep pour to cure.
What you’ll need
- Deep pour resin
We recommend Apex Deep Cast resin by Just4youonline. It’s super easy to work with and low on bubbles. You can get 15% off here using code RESINFORBEGINNERS. - Pigment
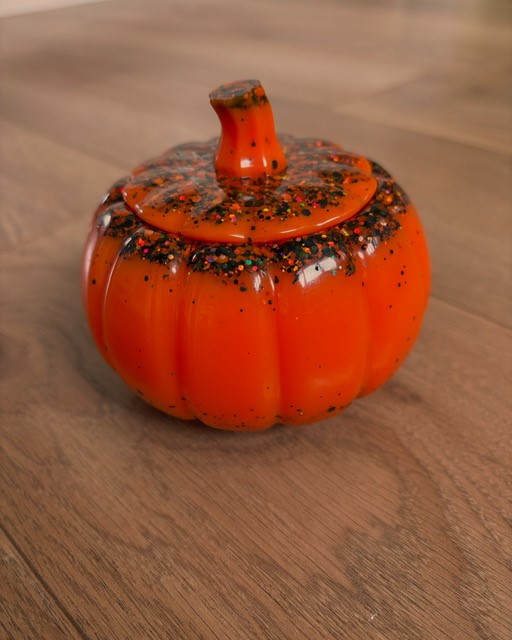
You can use pigment paste, mica powder, alcohol ink, acrylic paint. Basically, whatever takes your fancy. Just remember that you should stick to 10% or less colour to resin to make sure you don’t effect your curing. - Pumpkin Mould
We used the amazing quality pumpkin mould from Create Resin Craft Supplies. You can get 15% off with code: RESINFORBEGINNERS15. - Glitter
We found that glitter just added the perfect finish to our pumpkins. We again bought these from Create Resin Craft Supplies. - Mixing pots
- Silicone stirring sticks
How to make your resin pumpkin
- Mix your resin according to your brands instructions.
TIP: Check out our blog on how to reduce bubbles. - Add no more than 10% colour to your resin. We chose a pumpkin orange opaque pigment paste for this one.
- Next add your glitter. Stir thoroughly. We love how the Create With Resin glitter was heavy enough to sink to the edges of our mould.
TIP: Make sure your mould is on a level surface to ensure it cures level. This is especially important when using a mold with two parts like this pumpkin with a lid. Uneven cures can mean the lid won’t sit properly on your base. - Pour slowly in to your mould taking breaks at regular intervals to allow for bubbles to rise to the surface.
- Once both parts of your mould are filled, tap around the edges of your mould gently to help bring bubbles to the surface.
TIP: We cover our curing moulds with a food cover like this to ensure they don’t get any dust or lint in. - Ensure your resin is allowed to cure for the full time. Deep pour resin can take 72 hours or more to cure.
- When you are happy that your pumpkin is cured, it’s time to de-mould. These moulds can be tricky to de-mould. We add a little washing up liquid to the top and run a finger around the edge before de-moulding. It makes a huge difference – give it a go!
- ENJOY!
Resin pumpkin video tutorial
@resinforbeginners Part 1 | Pumpkin preperation 🎃 is anyone else getting excited for Halloween? I am! Get this mould and glitter from @createresincraftsupplies and the always amazing Apex Resin from @Just4youonlineUK Discount code in the comments 🎃 #resin #asmr #epoxy #halloween #halloween2024 #🎃 #pumpkins #pumpkin #halloweencrafts #epoxyresin #glitter #resinforbeginners #resintutorial #resinart #resinmould #resinsupplies #apexresin ♬ Halloween ・ cute horror song – PeriTune
@resinforbeginners Pumkin unveiling 🎃 This one definitely got stuck 😅 Good old Fairy Liquid to the rescue! Watch to the end to see how amazing it turned out 🎃 #resin #epoxyresin #halloween #gliter #asmr #asmrresin #asmrtiktoks #resinpour #resinforbeginners #pumpkins #epoxy #deeppour ♬ Pumpkin Spice – BDR Music
Happy Halloween!