Are you looking to preserve fresh flowers from a special occasion? Drying fresh flowers and adding them to epoxy resin is a great option.
You can add dried flowers to projects such as jewellery, decorative items like trays and book ends, keyrings or lights. The process can be costly and does require patience but it’s absolutely possible to do as a beginner and is often how people get in to working with resin.
What are the options for drying flowers?
Air Drying:
This is a great free option and requires very little. You’ll need to bundle the flowers you’d like to dry. Make sure your bunch isn’t too large, separate in to multiple bunches especially if your flowers are large or bushy. They need airflow to dry. Next, tie the flowers together in small bunches, securing them with a rubber band or twine.
Now, choose a warm dark place (we use our garage), and hang the bundled flowers upside down. Make sure they are not exposed to direct sunlight.
Depending on the type of flowers, it may take several weeks for them to completely dry. You may find that your bunches dry at different speeds. You can take out flowers that have already dried leaving larger ones more space to get air.
Silica gel:
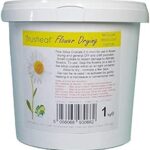
Silica gel is a material that absorbs moisture. We buy ours from Amazon Prime. You need to make sure you buy enough to submerge your flowers so these 1kg pots are great. You can also use the gel multiple times so its value for money.
When using silica gel, you’ll need to prepare a container: Pour a layer of silica gel into a container that has an airtight seal.

Place flowers in silica gel: Gently bury the flowers in the silica gel, making sure they are completely covered. Ensure you place beads in the middle of the flowers too as this will ensure they are dried fully.
Seal the container. Close the container tightly and leave it undisturbed for several days until the flowers are dry. Some larger flowers can take up to 3 weeks to fully dry.
Silica sand:
Silica sand is used in the same way as silica beads. It is however better for smaller more delicate flowers as it is finer grains rather than small balls of gel that can be too harsh.
It does take a little more patience when the flowers are dry as the sand can sometimes need a find brush to clean up the flowers and ensure there’s no sand on your flowers before adding them to resin.
Again, you need to make sure you buy a big enough tub like this one from Amazon to ensure you can cover your flowers completely.
Pressing Flowers:
This option is best for flatter flowers. Choose flowers that are relatively flat, like pansies or daisies. It is possible to use bigger flowers but they can mould if they don’t dry quick enough.
You’ll need a good quality flower press that allows you to dry multiple flowers at a time.
You’ll need to place flowers between paper: Arrange the flowers between layers of absorbent paper, such as newspaper or blotting paper.
It may take a few weeks for the flowers to dry completely using this method.
Once your flowers are dry…
Check out our blog on how we preserve flowers to make epoxy resin light up letters. The options are endless though.

