
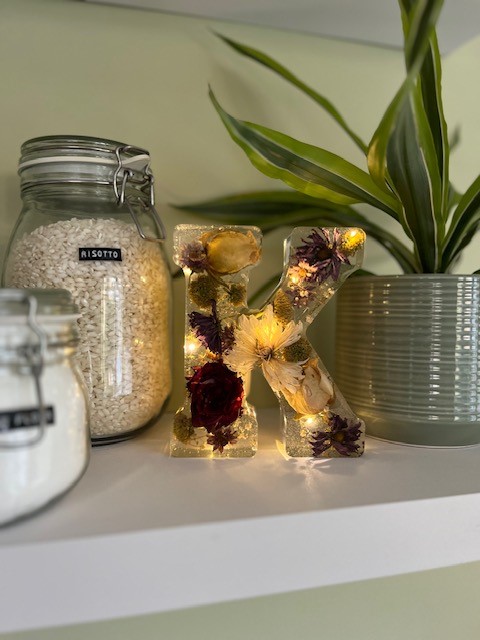
Making an LED light up epoxy resin letter can be fun and they are really popular gifts. Our light up epoxy resin letter tutorial gives you step by step instructions for making this simple yet beautiful project.
Project difficulty: Medium
Project time: 2-4 days
Choose your mould
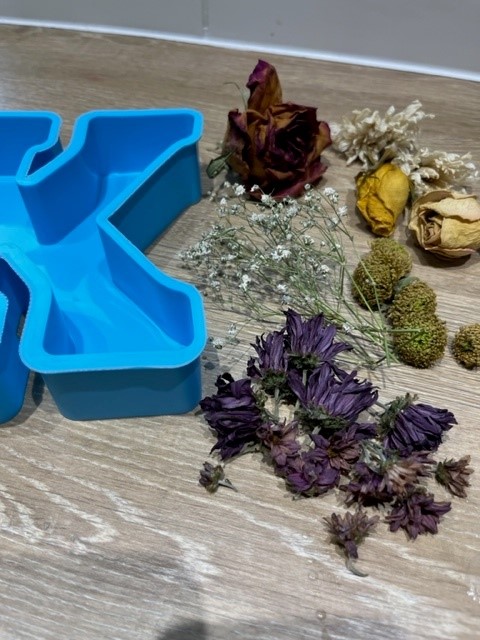
Firstly you want to choose a really sturdy silicone letter mould. There’s a huge number of options on the market but we’ve tried a few that just aren’t thick enough and start to loose their shape when you add your flowers or embellishments.
We use these ones from Amazon. They’re available on Prime so you don’t have to keep a full stock of letters and can buy the ones you need as orders come in. If you find your mould isn’t quite holding up when you pour in your resin, you can pack around it with blocks of wood or tea towels.
Choose your epoxy resin
Again, there’s a massive range of epoxy resin on the market. You want to choose one that is not only cost effective but strong, easy to mix and isn’t likely to produce a huge amount of bubbles. Our recommendation is Apex Resin as it is easy to work with. You can get 15% off with the code at the bottom of this blog.
This resin is a good all rounder with a low viscosity. It is not a deep pour resin though so would not work if you are looking to do a single pour in a deep letter mould. We do recommend at least 2 layers when creating a large letter though. The first pour will help anchor your flowers and the second, cover them and the lights.
Select your LED lights
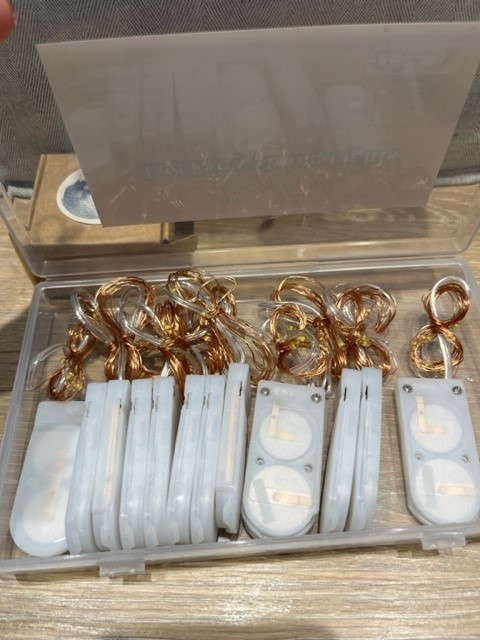
Make sure you don’t buy lights that are too long as they won’t fit in your mould. You want to make sure there are enough lights to have an impact though. We buy these LED battery operated lights as they give a perfect warm glow and the cable is discrete when used in your resin. You could also consider using a wooden base with LED up light.
Decide what to add to your light up epoxy resin letter
The options are basically endless:
– Glitter
– Pigments like alcohol ink, mica powder, resin paste
– Natural materials like sand, shells, flowers and plants
– Items like crayons, toys, memories and photos
The key thing to remember is to make sure any items you’re adding are fully dry. Flowers can be hand dried or silica dried. with sand or gel It will take patience though as it can be a few weeks to ensure larger flowers are dry to their core. Slightly fresher flowers will loose their colour and could eventually be subject to mould. Don’t rush it is our advice!
Read our blog on how to dry flowers.
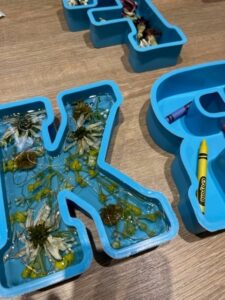
You’ll want to arrange your items in your mould to make sure you’re happy with the placement. Use the wires from the lights to weigh down lighter items. I always turn the lights on to check I’m happy with the spread of lights.
Add your Epoxy Resin
- Make up your resin according to the instructions and pour in two layers with 24 hours apart. Some high quality deep pour resins may allow you to pour it in one go but check the depths on the instructions.
- If you pour in one go and the resin isn’t suitable for this your resin is unlikely to cure properly and could end up being soft of misshapen.
- Pouring in two layers also gets around the issues of items floating. Your first pour should be shallow and act as a glue allowing your items to set in the mould. Your second layer should provide full coverage and fill up to the top of your mould.
- Make sure you leave at least half of your resin curing time between pours. So if your resin bottle says that the curing time is 24 hours, leave 12 hours before pouring your second layer. Pouring too soon can cause more obvious join lines.
- We recommend waiting 10 minutes after each pour and going back to your letter with a heat gun specifically designed for crafting, like this one from amazon, and lightly heating the resin to remove any bubbles. Make sure you keep the heat moving to avoid overheating your resin or damaging your mould.
Finishing touches
Carefully demould your letter and lightly sand with fine sand paper around the edges. Take care to not scratch other parts of your letter with the sandpaper. Providing you have used a good quality mould and resin, there shouldn’t be any need to sand and polish the full letter.
Finally, ensure you test your light and don’t forget to photograph it!

Check out the Cullercoats Crafts shop for inspiration and to buy your own LED Resin Letter.
You can also read our tutorial for adding Lego to large letters.
Thank you for the great information, I learnt a lot from
your post