
River tables and river-style resin projects have become incredibly popular in the resin art world. But one of the biggest challenges makers face is finding a reliable mold that is reusable, sturdy, and flexible enough for different designs.
That’s where the Resiners® River Table Epoxy Resin Mold with Adjustable Divider comes in.
In this review, I’ll share my experience with the mold, what makes it different, and a step-by-step guide on how to use it successfully.
First Impressions
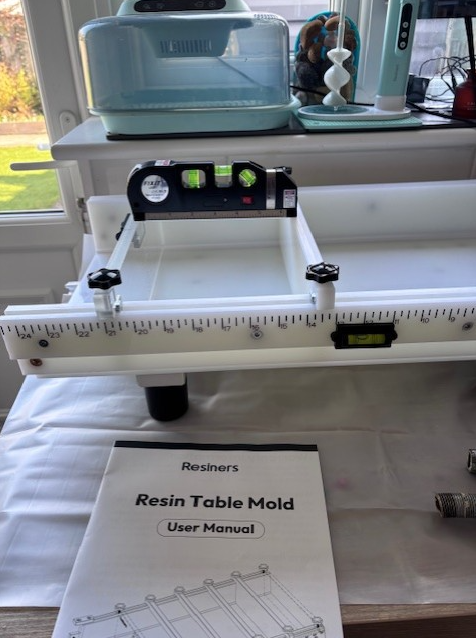
When I first received the Resiners river table mold, the quality immediately stood out.
Unlike many silicone molds that can warp or tear over time, this mold is built from thick, durable silicone panels supported by a sturdy frame. The adjustable divider is a brilliant feature because it allows you to create different lengths and depths of resin depending on your design.
This makes the mold extremely versatile for projects like:
- River serving boards
- Coffee tables
- Charcuterie boards
- Decorative wall art
- Resin and wood craft pieces
For beginners especially, having a mold that is easy to assemble and reuse removes a lot of stress from the process.
Key Features
Adjustable Divider
The standout feature is the movable divider, which allows you to control the width of your pouring space. This means you can create longer or shorter projects without needing multiple molds.
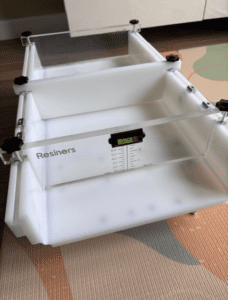
Flexible design with the possibility of extending
You can connect multiple moulds together which is incredibly easy and makes it so flexible for creating longer tables or bigger pours. The kit comes ready with the fastenings to extend should you buy another kit.
Easy to assemble
This mould is super easy to put together and the box comes with all the instructions you need. You can also check out my assembly video at the bottom of this blog to see how it was done.
Easy to adjust and level
The adjustable feet and built in spirit levels make this mould super easy to adjust and keep level, even if your workspace (like mine!) isn’t. This was a key feature for me.
Blocks and runners
The moveable blocks and runners are perfect for anchoring down your wooden pieces or other items you might be adding. It takes away the need for heavy weights and reduces the possibility of resin sticking to things it shouldn’t be sticking to.
Durable Structure
The mold is reinforced with panels that keep the shape stable during large pours. This prevents resin leaks and distortion while curing.
Reusable Design
Because it isn’t a single flexible mold, it can be disassembled and reused many times, making it ideal for makers who want to produce multiple pieces. Just make sure you store it carefully and avoid any metal parts touching the mould to avoid scratches.
Easy Demolding
The silicone interior makes demolding surprisingly easy once the resin has cured.
How to Use the Resiners River Table Mold
Using this mold is straightforward, even if you’re fairly new to resin work.
Step 1 – Assemble the Mold
Start by assembling the mold according to the instructions. See our tips:
- Don’t over tighten the screws before all parts are together
- Check the metal runners are slotted into the groove correctly. We may have put these upside down on our first attempt (oops!)
- Tighten all connectors to ensure the mold is stable
- Adjust the legs to ensure your mould is level before pouring any resin. We used an extra spirit level to carry out an extra check.
@resinforbeginners Watch us assemble the new @Resiners HDPE table mould. We’ve got an exciting project planned for this one. Hint:🚰 watch this space for the process video. Head to our link in bio for discount code #resiners #resinmould #processvideo #resin #epoxy ♬ Pop beat BGM / long version(1283324) – nightbird_bgm
Step 2 – Prepare Your Inserts
River tables are usually made with two pieces of wood with a space for resin in the middle. If you are using wood in your project, make sure you:
- Cut your wood to size
- Sand the edges smooth
- Seal the wood with a thin coat of epoxy or wood sealer
- Place your wood in the mould
- Use the blocks provided to anchor down your wood securely
Sealing helps prevent air bubbles escaping into the resin later.
Once sealed, place the wood pieces inside the mold on either side of the divider.
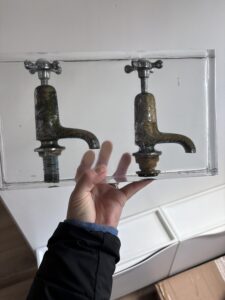
You’ll see that for our first piece, we decided to try something all-together different. We used some old taps which a friend wanted to preserve from a house renovation. This mould was perfect for this project too as many of the silicone moulds we looked at were too flimsy or not deep enough.
To prepare the taps, we simply rinsed them and brushed off any loose metal or paint and placed them in the mould.
Step 3 – Seal the Edges
Even with good molds like this one, it’s smart to seal any small gaps around your dividers.
You can do this by:
- Applying hot glue (you’ll find a tube provided in this kit)
- Using silicone sealant
- Adding a thin line of resin around the edges
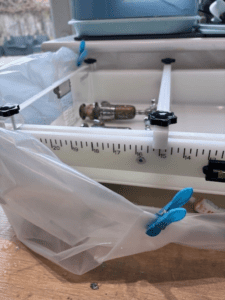
This prevents resin from leaking during the pour. For extra reassurance, we used the plastic sheet provided and pegged the corners up so that if there were any leeks, we’d catch it.
Step 4 – Mix Your Resin
For river tables and larger moulds like this, you should always use a deep pour epoxy resin.
Follow the manufacturer’s mixing ratio carefully.
Typical process:
- Measure Part A and Part B accurately
- Mix slowly for 3–5 minutes
- Scrape the sides and bottom of your mixing container
If you want colour, add pigments or dyes at this stage.
Step 5 – Pour the Resin
Now the fun part!
Slowly pour the resin into the river section between the wood pieces (or whichever items you’ve laid in your mould).
Tips for best results:
- Pour slowly to reduce bubbles
- Use a heat gun or torch to remove surface bubbles
- Avoid overfilling the mold
- Continually check for any gaps in your divivers
@resinforbeginners Can you preserve taps in resin? Not a question I thought I’d ever be asked 😂 but … here we are. Giving it a shot. Why? Because my friend asked. I’ll hopefully have story time after they’re all done. #resin #epoxyresin #resiners #taps #apexresin ♬ Work On Me – TDO
Step 6 – Let It Cure
Leave the resin to cure undisturbed.
Keep the project in a dust-free environment while curing. We partially covered the mould with a plastic sheet to reduce dust getting in to the resin.
Curing time will vary depending on your epoxy, but deep pours often take 24–72 hours.
Step 7 – Demold Your Piece
Once fully cured:
- Loosen the mold frame by unscrewing the parts
- Remove the side panels
TIP: You may need to use the blocks provided or gently tap the corners of your mould to release the corners before the middles - Carefully lift out your project
This is where the Resiners mold really shines, as the panels make demolding simple without damaging the piece.
Take a look at our final piece. What do you think? Not something I ever thought I would be putting in resin but, here we are. I think it looks great and my friend is going to be really happy with how it turned out.
Final Thoughts
The Resiners® River Table Epoxy Resin Mold with Adjustable Divider is a fantastic tool for anyone wanting to create river-style resin projects.
Pros
✔ Adjustable divider for flexible designs
✔ Durable and reusable construction
✔ Easy demolding
✔ Great for beginners and experienced makers
Cons
✘ Requires proper sealing before pouring
✘ Larger projects still require careful leveling
Overall, it’s a very practical mold that saves time and improves results, especially if you plan to make multiple river-style projects.
✅ Rating: 9/10
If you’re looking for a reliable mold for river boards, big projects or small river tables, this one is definitely worth considering.