
Epoxy resin beginner? We’ll help get you started
Are you an epoxy resin beginner? Are you thinking about venturing in to epoxy resin crafts but not sure where to begin?
Our beginners guide to epoxy resin gives you top tips to help you prepare for crafting with epoxy resin.
Creating art and crafts with epoxy resin can be a rewarding and enjoyable experience. Epoxy resin is a versatile material that can be used to make a wide range of projects, from jewellery to table tops. Check out our beginners guide to find out what you need to get started.
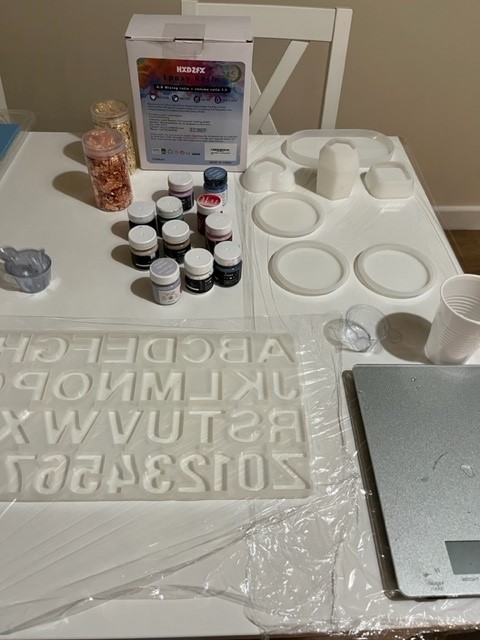
Your epoxy resin essential kit list
Our list of essential items will help you get all you need to get started on your first epoxy resin projects. Ideal for beginners, these recommendations are all tried and tested and great value too.
Epoxy Resin Beginners Kit
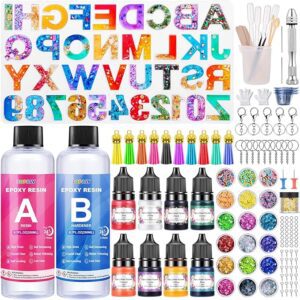
Choose a high-quality easy to work with beginner kit. Kits often include both resin and hardener and will come with good instructions. We love this kit from Amazon. It’s really cheap and comes with absolutely everything you need to make a really wide range of projects including keyrings and jewellery.
Safety Gear
Resin can be harmful. Even if you choose a non toxic or low VOC resin, you can still get irritation if resin comes in to contact with skin or eyes. We recommend that you use:
– reusable safety gloves to stop getting resin on your hands. It will stick!
– safety glasses in case of any splashes
– respirator to protect you from fumes that are created when working with epoxy resin. This is especially important if your resin is toxic.
Always make sure you work in a well ventilated space away from children and pets. If resin comes in to contact with your skin or eyes, always consult a medical professional and have your resin and any safety leaflets that came with it to hand.
Mixing Containers
- Use plastic or reusable silicone containers for mixing resin. Avoid paper or foam as they may contaminate the mixture. They will not be as stable too and may leak. We like to reuse yogurt pots where possible. Just be sure to wash them thoroughly.
Stirring Sticks
- Use wooden or plastic or ideally silicone sticks for stirring. Avoid metal, as it can introduce impurities. Silicone sticks can be easy to clean and re use.
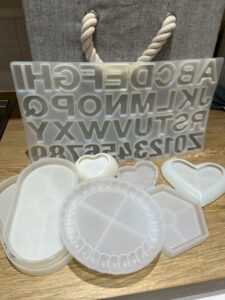
Moulds

Depending on your project, you might need silicone moulds. Places like Temu and SHEIN have an amazing range of low cost silicone moulds for resin. We recommend that you always check the size (we may have been caught out with trying accidental miniature moulds!). Ensure that all of your moulds are clean and free of any residue. You can wash your moulds with warm soapy water but ensure they are well rinsed with cold water and left to air dry.
Release Agent
- Some moulds may require a release agent (like mould release spray) to help demould your creations easily.
Measuring Tools
- Use accurate measuring cups or scales to ensure the correct resin-to-hardener ratio. We use these scales as they can measure liquid and take the way the need to convert any measurements.
Heat Gun or Torch
- These are used to eliminate bubbles in the resin. This one from Amazon is great as its not too powerful. Anything too big is likely to push your resin out of the mould. Just be sure not to hold it more than a few seconds over your mould or you can risk damaging them.
Spirit level
- Ensure your work surface is level. You may need levelling tools to prevent uneven resin distribution. Even if your resin claims to be ‘self levelling’ you want your surface to be as level as possible.
Step by Step Beginners Guide to Epoxy Resin
- Prepare Your Workspace
Cover your work area with a plastic drop cloth or disposable tablecloth to catch any drips. Remember, resin sticks to ANYTHING! - Safety First
Put on your safety gear, including gloves, safety glasses, and a respirator if working in a poorly ventilated area. - Measure and Mix
Follow the instructions on your epoxy resin kit to measure the correct ratio of resin to hardener. Mix thoroughly but avoid introducing air bubbles. - Add Pigments or texture
If you want to add colour or other elements (like glitter or flowers), do so after the resin and hardener are mixed. Stir gently to distribute evenly. - Pour into Mould
Pour the mixed resin into your prepared mould. Be mindful of pouring slowly to avoid bubbles. - Eliminate Bubbles
Use a heat gun or torch to carefully pass over the surface of the resin to eliminate bubbles. Hold the heat source about 6-8 inches away. For more ways of reducing bubbles in your epoxy resin – check out our blog. - Cure Time
Allow the resin to cure according to the manufacturer’s instructions. This can range from a few hours to a day or more. - Demould
Once cured, carefully demould your creation. If you used a release agent, it should come out easily. - Finish and Polish
Sand any rough edges and polish the surface if needed. Follow any additional steps suggested by the resin kit. - Admire the end result
Enjoy your finished epoxy resin creation!
@resinforbeginners Watch us create our new limited edition epoxy resin Christmas drinks coasters. Www.cullercoatscrafts.com #resin #resinart #resincrafts #handmade #christmasgifts #christmasiscoming #giftideas ♬ Sunny Day – Ted Fresco
TOP TIPS
Practice on Small Projects
If you’re new to epoxy resin, start with small projects to get a feel for how it behaves.
Follow Instructions
Always follow the manufacturer’s instructions for the specific epoxy resin kit you’re using.
Ventilation is Key
Work in a well-ventilated area to minimize exposure to fumes.
Experiment with Pigments
Have fun experimenting with different pigments, dyes, and inclusions to create unique effects.
**Remember**, practice makes perfect, and as you become more comfortable with epoxy resin, you can explore more advanced techniques and projects.
Check out our other blogs for top tips and ideas for your next project.


What is the best way to wash the reusable cups?
If they’re soft silicone, let dry, turn inside out and scrape the resin off and use tape to ensure small bits of resin are pulled off then wash with soapy water and let air dry. You can also wipe with baby wipes when the resin is still wet and use 99.9 isopropyl spray to wipe clean. Hope that helps 🙂
I leave the popsicle stick in the cup and let it dry and pull it out.
silicone utensils and cups are easily cleaned by letting them dry and peeling away the remaining resin.. I use tape around my fingers to pick up any bits that may be left behind
I am unsure what the mixture is to start using the Resin. Do you had both A and B together equal parts, with every stage of using resin? This is the only reason I haven’t started making projects.
Hi, this will depend on the type of resin you are using. Most resins are 1:1 ratio so if you use 50ml part A you will use 50ml part B. You then mix both parts for 3-5 minutes until you have a clear liquid. Resins will vary so you should always follow the instructions provided.
I like the efforts you have put in this, regards for all the great posts.